You won’t believe how easy it is to spruce up your walls on a budget! Grab some thrift store frames, print your favorite quotes, and use washi tape for a pop of personality. Want a colorful touch? Try your hand at canvas art or vibrant string art—it’s all about those bold strokes and creative flair. Plus, old frames can become stunning displays with a little spray paint magic. Stick around, and I’ll share even more fun DIY ideas!
Design Highlights
- Gather mismatched frames from thrift stores and print photos or quotes to create an eclectic wall display for an affordable price.
- Craft unique string art using colorful string and nails on a wooden board for a personalized touch to your decor.
- Create vibrant canvas art with bold colors and textures, focusing on expression rather than perfection for a striking visual impact.
- Utilize natural materials like branches and dried flowers to make rustic wall hangings, enhancing your space with organic elements.
- Experiment with macramé techniques for stylish plant hangers or wall hangings, embracing imperfections to achieve a bohemian aesthetic.
Budget-Friendly Gallery Wall Ideas
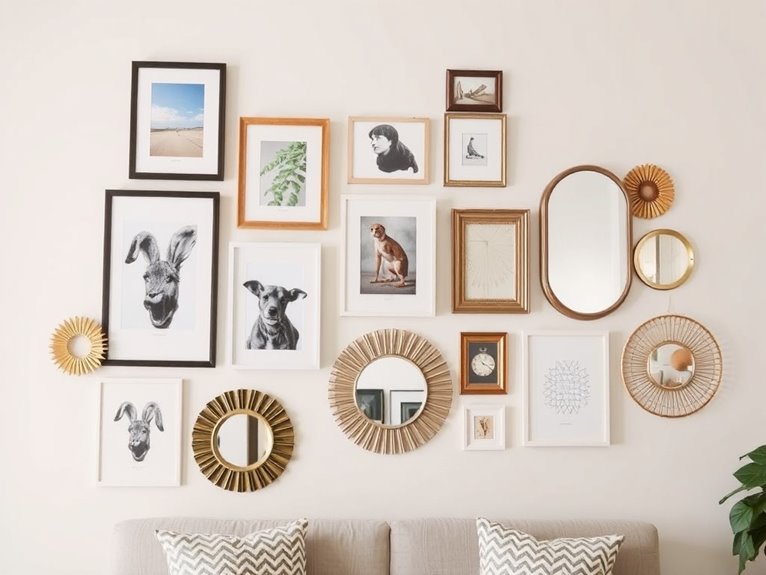
If you’re like me and want to spruce up your walls without breaking the bank, creating a gallery wall can be a game changer. Start by gathering frames from thrift stores—they’re often just a couple of bucks each. Mix sizes and styles for a fun, eclectic vibe. Next, print out your favorite photos or even quotes that inspire you; I usually go for the ones that make me giggle. Use washi tape for an easy, no-damage way to stick them on the wall. Arrange everything on the floor first to find the perfect layout—don’t worry, I’ve knocked over a lamp doing this! Finally, step back, admire your handiwork, and pat yourself on the back for being so crafty.
Craft Unique String Art for a Pop of Color
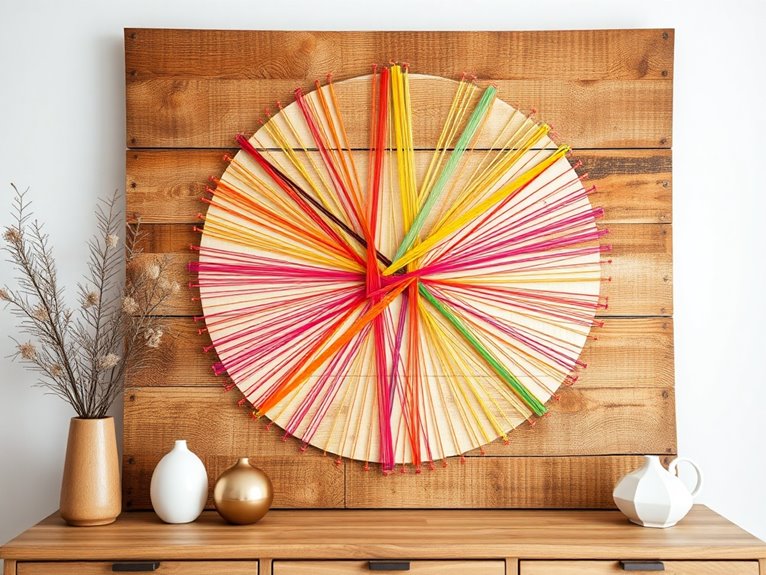
Creating unique string art can be one of the most satisfying projects you’ll tackle under $20, and honestly, it’s easier than it sounds. First, grab a wooden board (thrift stores are goldmines), some colorful string, and nails. Sketch your design lightly—think hearts, stars, or even your initials.
Next, hammer in nails around the outline, leaving enough space for your string to weave in and out. Trust me, it’ll look cooler than it sounds!
Now, take the string and start wrapping it around the nails, creating a pattern. Don’t overthink it; just let your creativity flow!
Once you’re done, hang it up and admire your handiwork. Who knew you could create art without a degree?
Create a DIY Dreamy Macramé Wall Hanging
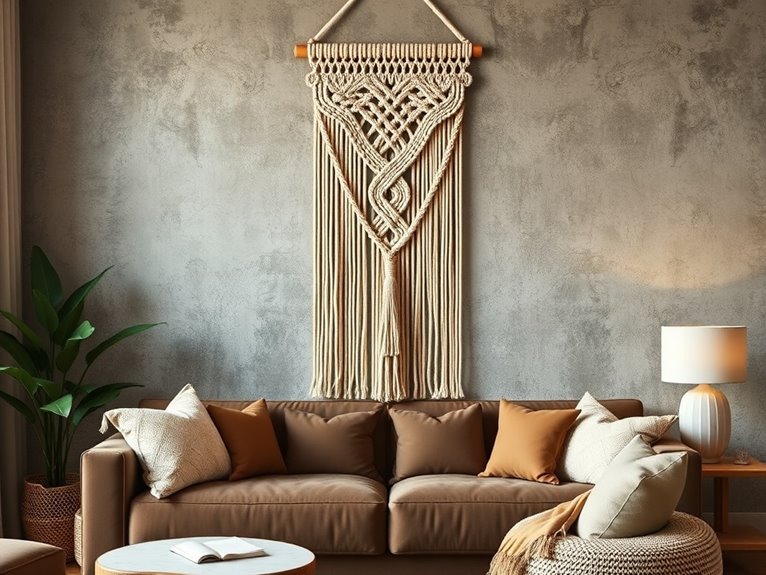
Macramé wall hangings are a fantastic way to bring a boho vibe to your space, and the best part? You can totally make one for under $20! Start by grabbing some cotton macramé cord (about 100 feet should do). Cut several lengths—around 6-8 pieces, each about 4-6 feet long. Now, tie a lark’s head knot to secure them onto a wooden dowel or branch. Next, get creative with your knots: square knots, double half-hitches, you name it! Don’t worry if your first attempt looks a bit wonky; it adds character, right? Once you’re happy with the design, trim the ends for a polished look. Hang it up and watch your wall transform! You did that!
Turn Old Frames Into Stylish Wall Displays
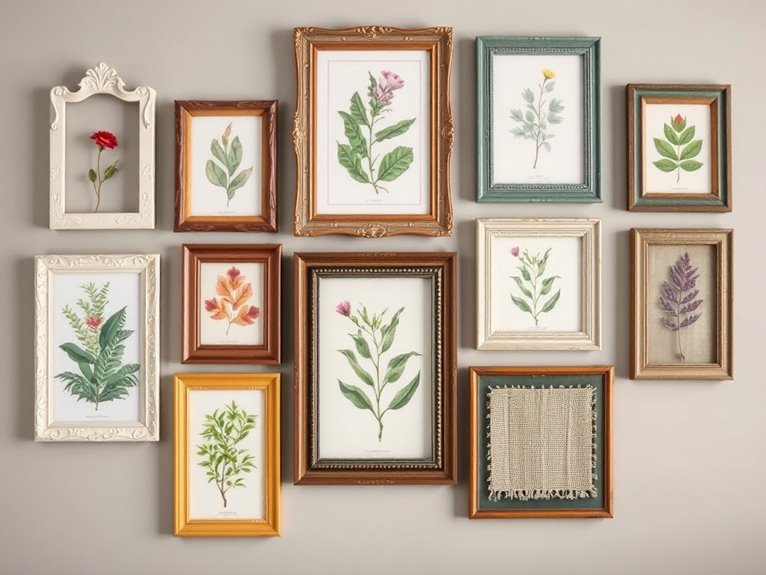
You might be surprised at how turning old frames into stylish wall displays can breathe new life into your space. First, dig through your attic or local thrift store for mismatched frames; trust me, they’re everywhere! Next, remove the glass and backing. If they’re a bit dull, a quick coat of spray paint can work wonders. Now, the fun part: arrange them on your wall. I like to lay them out on the floor first to find the perfect layout—just don’t trip over them like I did! Finally, secure them with nails or adhesive strips. You’ll have a chic gallery wall that looks curated and fancy, without breaking the bank. Who knew recycling could look this good?
Make a Bold Statement With Colorful Painted Canvas Art
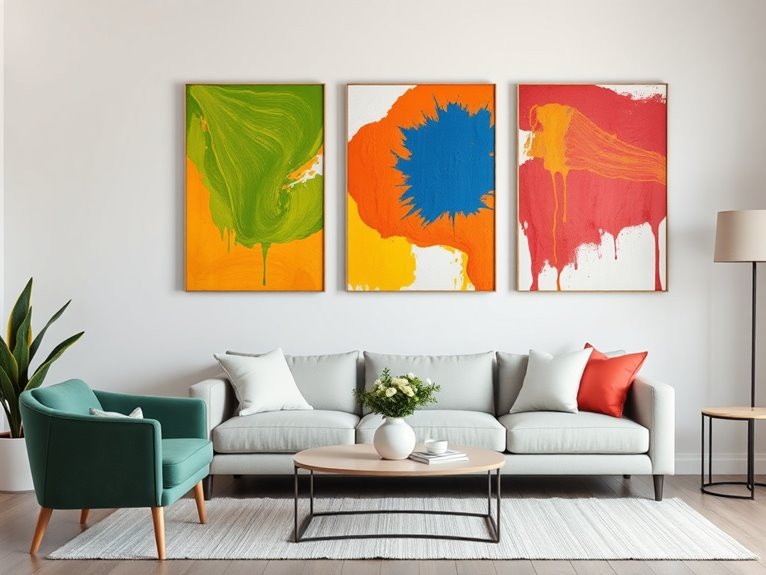
Now, release your inner Picasso! Use broad strokes, splatters, or even your fingers for texture. No need to overthink it; art is subjective, right? Once you’re satisfied, let it dry completely before hanging it up. Voilà! You’ve just added a personal touch to your space without breaking the bank. Trust me, your walls will thank you!
Utilize Washi Tape for Fun Geometric Patterns
After getting your creative juices flowing with that colorful canvas art, let’s keep the momentum going with something just as fun and a bit less messy. Enter washi tape! It’s like a crafting fairy godmother—easy to use and available in endless designs. You’ll be amazed at the geometric patterns you can create with just a few rolls. Here’s how to get started:
- Choose your colors: Pick a palette that speaks to you.
- Plan your design: Sketch out a rough idea on paper—trust me, it saves a lot of “oops” moments!
- Stick and peel: Start applying the tape directly to your wall. Don’t worry if it’s not perfect; embrace the quirky charm!
Get ready to transform your space!
Build an Elegant Floating Shelf for Stylish Decor
A chic floating shelf can elevate your decor game without breaking the bank. To whip one up, grab a wooden plank, brackets, and some screws. First, measure your wall space—no one wants a shelf that’s too small or too big, right? Next, sand that plank until it’s smooth as a baby’s bottom. Then, paint or stain it to match your vibe. Now, it’s time to attach those brackets to the wall; make sure you’re hitting the studs—trust me, you don’t want your shelf crashing down like my last attempt at baking! Finally, secure the plank to the brackets, and voilà! Style it with plants, books, or that weird statue you’ve been hiding. Happy decorating!
Craft a Cozy Fabric Wall Hanging From Scraps
While you might think creating a fabric wall hanging requires a degree in art, you can actually craft one using scraps you probably already have lying around. Honestly, I’ve made more than a few messes, but this one’s a keeper! Here’s what you’ll need:
- Old fabric scraps (think T-shirts, curtains, or even leftover quilting bits)
- A wooden dowel or branch (nature’s freebie!)
- Scissors and a hot glue gun (my trusty sidekicks)
Just cut your fabric into strips, tie them onto the dowel, and hang it up. Don’t fret if your knots look a bit wonky—charm is in the imperfections! I mean, who doesn’t love a cozy, handmade vibe? You got this!
Create Quirky Wall Planters for Indoor Plants
Wall planters can transform your space from drab to fab without breaking the bank. You’ll need some small wooden crates or even tin cans—whatever floats your boat. First, paint them in fun colors or patterns, but don’t worry if you mess up; it adds character! Next, attach them to the wall using sturdy screws or hooks. Fill with potting soil, and pop in your favorite indoor plants. Succulents are a great choice; they’re low-maintenance and forgiving, unlike my attempts at baking. Water them lightly, and you’re set. Trust me, your walls will thank you for this greenery. Plus, it gives you an excuse to show off your gardening skills—no pressure, right? Happy planting!
Upcycle Wooden Pallets Into Rustic Decor
Transforming old wooden pallets into rustic decor is not just budget-friendly; it’s an adventure in creativity! If you’ve got a couple of pallets lying around, you’re halfway there. Trust me; you won’t regret diving into this project. Here’s how you can get started:
- Create a pallet shelf: Just cut a pallet in half, sand it down, and mount it on your wall. Perfect for displaying your favorite knick-knacks!
- Make a garden trellis: Prop up a pallet in your garden, and watch your climbing plants flourish.
- Craft a rustic sign: Use stencils to paint a welcome message on a pallet piece. Hang it at your door for charm.
Make Your Own Inspirational Quote Boards
After you’ve had your fun with those wooden pallets, it’s time to get a little more personal with your decor. Making your own inspirational quote boards is a fantastic way to showcase your favorite sayings. Grab a canvas, some paint, and a stencil or just your trusty handwriting—don’t worry, mine’s worse than a toddler’s! First, paint the canvas a solid color. Once it’s dry, position your stencil or write your quote with a marker. If you mess up, just paint over it and try again—trust me, I’ve been there. Once you’re happy, hang it up! It’ll inspire you daily. Plus, it’s a great conversation starter, and who doesn’t love a little motivation on the wall?
Design a Bold Mural With Removable Wallpaper
If you’re looking to make a statement in your space, designing a bold mural with removable wallpaper is a super fun way to do it. Trust me, it’s like giving your wall a personality makeover without the commitment! Here’s how to get started:
- Choose a design that fits your vibe—think florals, geometric patterns, or something wild.
- Measure your wall carefully, because no one wants extra wallpaper lying around like a sad puppy.
- Prep your wall by cleaning it, ensuring the surface is smooth and dust-free.
Once you’ve got your materials, just peel, stick, and smooth it out. Voilà! You’ve transformed your room. Just be ready to brag about your DIY skills, because your friends will definitely ask how you did it.
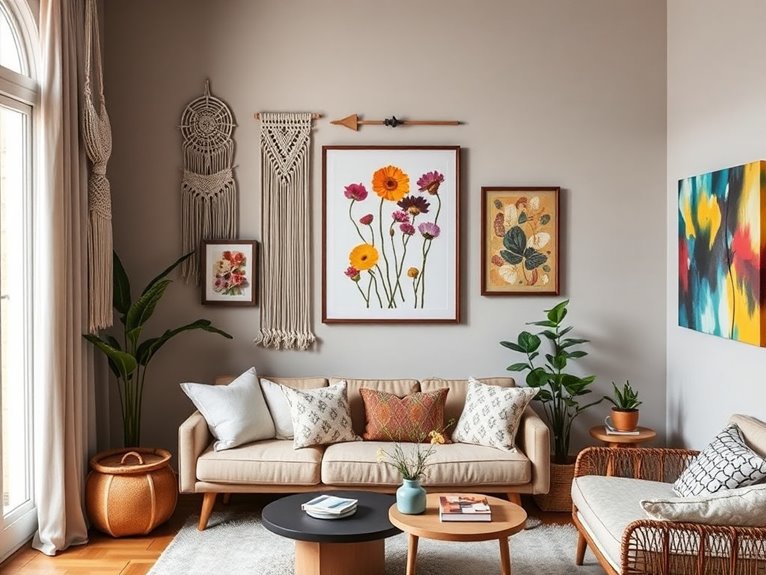
Experiment With Natural Elements for a Boho Vibe
While you might think creating a boho vibe requires a major budget, experimenting with natural elements can be both fun and wallet-friendly. Start by gathering some branches or twigs from your yard—seriously, nature’s a goldmine! You can create a simple wall hanging by tying them together with twine. Next, grab some dried flowers or leaves and use them to create a stunning centerpiece or frame. If you’re feeling adventurous, try your hand at making a macramé plant hanger. You just need some rope and a pot! Trust me, it’s easier than it sounds. Finally, don’t forget to incorporate rocks or shells for that perfect earthy touch. Embrace the imperfections—after all, that’s what boho is all about, right?