
If you’re looking to deck the halls without spending a fortune, I’ve got your back! Grab some mason jars, fairy lights, and dollar store decor to create festive lanterns. Or, start a DIY wreath with faux greenery glued to a foam base. Don’t overlook snowy pinecones for centerpieces—even I can manage that! Add a glittery garland with colorful ornaments, and you’ll be on your way! Stick around; there’s more crafty goodness ahead!
Design Highlights
- Create festive mason jar lanterns by filling jars with fairy lights and adding fake snow or pinecones for a cozy winter vibe.
- DIY Christmas wreaths can be made using foam bases, faux greenery, ribbons, and ornaments, showcasing your unique style on your door.
- Snowy pinecone centerpieces are easy to make with painted pinecones, glitter, and optional evergreen sprigs for added natural charm.
- Craft a glittery ornaments garland by threading vibrant plastic ornaments onto twine, interspersing bows or greenery for extra flair.
- Design holiday-themed table settings with a fabric runner, a bowl of ornaments, and personalized place cards for a festive dining experience.
Festive Mason Jar Lanterns

If you’re looking for a quick and charming way to brighten up your holiday decor, let me tell you about my obsession with festive mason jar lanterns! Seriously, they’re a total game-changer. Grab some mason jars, fairy lights, and a few decorations from the dollar store. First, fill your jars with those twinkling lights—don’t be shy, pack ’em in! Then, you can toss in some fake snow or pinecones for that wintery vibe. If you’re feeling artsy, paint the outside with frosted spray paint. Just remember to keep it light; I once turned a jar into a Picasso disaster! Finally, place a tea light underneath to create a magical glow. Trust me, you’ll want to make a whole army of these!
DIY Christmas Wreaths

Creating your own DIY Christmas wreaths can be a delightful way to add a personal touch to your holiday decor, and trust me, it’s easier than it sounds! Start with a simple foam or wire wreath base from the dollar store. Grab some festive faux greenery, ribbons, and maybe a few ornaments—whatever tickles your fancy!
Now, here’s the fun part: hot glue those greens onto the base like you’re icing a cake. Don’t worry if it gets a little messy; it’s all part of the charm! Add bows or ornaments for flair. You might even find you’re channeling your inner Martha Stewart—just without the perfection pressure!
Hang it up, and voilà! You’ve got a wreath that’s uniquely yours.
Snowy Pinecone Centerpieces
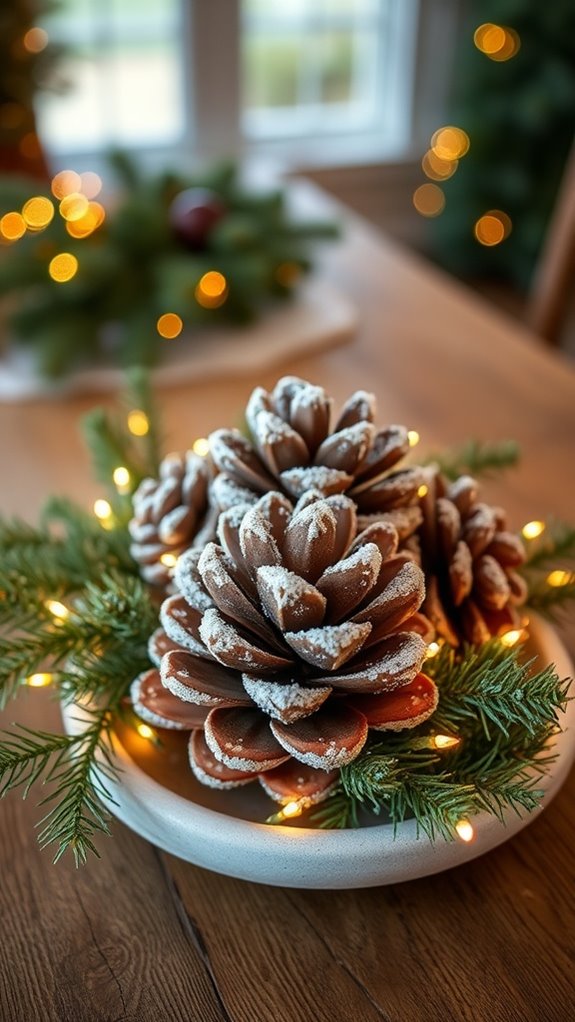
While the holidays can get chaotic, I promise that whipping up some snowy pinecone centerpieces will add a touch of magic to your table without breaking a sweat. First, grab some pinecones from your yard or the dollar store—seriously, they’re everywhere! Next, spray them with white craft paint and toss a little glitter while they’re still wet for that snowy effect. Let them dry, then arrange them in a cute bowl or on a platter. You can even add faux snowflakes or twinkling lights for an extra sparkle. Feeling fancy? Toss in some evergreen sprigs from your backyard. Trust me, your guests will think you’re a holiday decorating wizard, even if you’re just winging it!
Glittery Ornaments Garland

Ready to dazzle your holiday space without breaking the bank? Let’s whip up a glittery ornaments garland that’ll make your guests ooh and ahh! First, gather some plastic ornaments—dollar stores have loads in vibrant colors. You’ll need about 20-30 for a nice length. Grab some twine or string; I prefer twine for that rustic vibe.
Now, simply thread the ornaments onto the string, spacing them out evenly. Need a little pizzazz? Add some bows or seasonal greenery interspersed between ornaments.
Hang it up, and voilà! You’ve got a stunning, sparkly decoration that’ll brighten your room. Just be careful—glitter tends to stick around longer than your relatives! Who knew crafting could be so festive and fun?
Holiday-Themed Table Settings

Envision this: your dining table transformed into a festive wonderland, complete with twinkling lights and charming decorations that make every meal feel like a celebration. I love creating holiday-themed table settings that wow my guests without breaking the bank! Here’s how you can do it, too:
- Table Runner: Grab some cheap holiday fabric and cut it to size. Instant elegance!
- Centerpiece: Fill a glass bowl with ornaments or seasonal fruit. It’s simple yet stunning.
- Place Cards: Use festive paper and write guests’ names. It adds a personal touch!
- Candles: Find colorful candles for ambiance. Just be careful—I’ve melted a few before!
Whimsical Stocking Holders
After setting the stage with a fabulous holiday-themed table, don’t forget about those stockings! You’ll want whimsical stocking holders to bring a playful touch to your decor. Head to your local dollar store and grab some cute figurines—think reindeer, snowmen, or even Santa himself. Next, find a piece of sturdy cardboard or a small wooden board. Glue those figurines onto the board, making sure they’re spaced out evenly. If you’re feeling extra crafty, add some ribbon or glitter for sparkle! Once it’s dry, you can simply rest your stockings on their cute little heads. Trust me, they’ll be the talk of your holiday gathering—way more fun than boring old hooks! Plus, you’ll impress your friends without breaking the bank!
Recycled Gift Wrap Wall Art
While you’re wrapping up your holiday shopping, don’t toss that leftover gift wrap just yet! You can turn it into fabulous wall art that’ll impress your guests and save you money. Here’s how I do it:
- Gather your leftover gift wrap in various colors and patterns.
- Cut them into fun shapes—think stars, trees, or even abstract designs.
- Use a canvas or a sturdy piece of cardboard as your base.
- Glue those cutouts onto your base, overlapping for a layered effect.
Voila! You’ve got unique art that’s as festive as it is eco-friendly. Plus, bragging rights for being the artsy friend! Trust me, it’s easier than finding matching socks in December!